Configure a FreeBSD 10.1 server for hosting Laravel 5.x applications & Git.
Installing a few tools and utilities before we begin…
Everyone comes to have their favourite Shell, Editor and set of utilities, and I’m no different… This first section I’m just going to set-up my favourite set of utilities and tools that I use on a regular basis!
Setting the correct server timezone
First up it’s a good idea to ensure that your server’s timezone is correctly set, you can check your server’s current date and timezone by running:
date
If this is incorrect, you can use tzsetup tool to set the correct timezone, so if you need to set it correctly, run the following command and follow the prompts…
sudo tzsetup
Configure NTP for automatic time updates
It’s also a good idea to enable NTP to ensure that our server’s system clock is kept up to date automatically, lets do this like so:
sudo sh -c 'echo ntpd_enable=\"YES\" >> /etc/rc.conf'
sudo sh -c 'echo ntpd_sync_on_start=\"YES\" >> /etc/rc.conf'
…and we’ll start the service now (instead of waiting for the first reboot)…
sudo service ntpd startThat’s great – we can now rest assured that our server will attempt to keep it’s system time up to date automatically!
Lets move on…
Installing BASH
I personally prefer BASH instead of tsh, and nothign else really feels ‘right’ to me, so I’ll install BASH like so:
sudo pkg install bash
Then ensure that I add the fdescfs mount point as mentioned at post installation message of BASH, add the following line to /etc/fstab, we can do this automatically like so:
sudo sh -c 'echo "fdesc /dev/fd fdescfs rw 0 0" >> /etc/fstab'
Excellent – Now we’ll remount everything like so…
sudo mount -a
Then set our shell to use BASH:
sudo chsh -s /usr/local/bin/bash {your_username_here}
With that now done, you’ll just need to logout and back in again for the changes to take affect!
Installing Nano
I personally find that using Nano as an CLI editing tool is perfect for my requirements and doesn’t give me any issues when using my MacBook Pro and the absence of the ‘Insert’ key (Yes, even the ‘i‘ key doesn’t work for me consistently either!)
I’m used to using Nano and personally like it very much over the likes of vi, emacs etc.
So I’ll simply install it like so:
sudo pkg install nano
Now it’s installed, if you type:
nano
You should now see Nano on your server – excellent stuff, press Ctrl+Xand lets move on…
Installing Wget (and cURL)
Wget is a great tool for downloading files from the internet from the console, some people prefer/use cURL but personally I use Wget but given it may just be worth installing both….
sudo pkg install wget curl
The reason that I’ve installed both is that it’ll probably save you hassle in the long run as sometimes installation scripts that you use from the web – such as the Composer one that we’ll run later on in this post!
Install Git Client
As a software developer myself and the fact that I deploy 99% of my code to production servers using Git nowadays, having the Git client installed on my web server is very important as otherwise deploying later versions of my code would be a hell of a lot of hassle.
sudo pkg install git
Now, give it a little test by checking the current version number that was just installed:
git --v
Excellent stuff – although technically not required (if you’re just pulling code) you can set your Git username and password like so:
git config --global user.name "Bobby Allen"
git config --global user.email ballen@bobbyallen.me
Great stuff… let move on…
Setting a root password
If you’re using a FreeBSD VPS from DigitalOcean you’ll find that the root password has not yet been set (FreeBSD by default does not allow root access over SSH too btw) so DigitalOcean use a ‘freebsd’ account instead…
To set the ‘root’ password you can use this command:
sudo passwd
Excellent stuff, if you need to access and run commands exclusively as root (rather than just sudo’ing) you can switch user to the root account like so:
su -
Installing Nginx
I personally prefer Nginx for hosting Laravel applications, Nginx is faster than, and has a much smaller resource footprint in comparison to the Apache HTTPd server, so I’ll install Nginx as the web server…
sudo pkg install nginx
Then enable it…
sudo sh -c 'echo nginx_enable=\"YES\" >> /etc/rc.conf'
Now start the service…
sudo service nginx start
Try accessing your servers IP address and you should then get the Nginx ‘Welcome’ page, assuming all went well lets move on and install PHP…
Installing PHP
At the time of writing PHP 5.6 is the latest stable release, we’ll now install this as well as all of the modules required by Laravel 5.x:
sudo pkg install php56 php56-gd php56-hash php56-phar php56-ctype php56-filter php56-iconv php56-json php56-mcrypt php56-curl php56-mysql php56-mysqli php56-pdo_mysql php56-sqlite3 php56-pdo_sqlite php56-tokenizer php56-readline php56-session php56-simplexml php56-xml php56-zip php56-zlib php56-openssl openssl
We now need to copy the php.ini-production file out to php.ini to give us a working file (based on the production default settings)
sudo cp /usr/local/etc/php.ini-production /usr/local/etc/php.ini
To ensure that OpenSSL works (Composer amongst other things will requires this when accessing files over the web using SSL) we need to configure the path to download and set the cacert.pem file…
Firstly however we’ll download the latest cacert.pem file from the Curl website and ensure we place it in the /etc/ssl directory like so:
cd /etc/ssl
sudo wget http://curl.haxx.se/ca/cacert.pem
Lets now edit the PHP.ini file and set the path so that PHP uses the correct file:
sudo nano /usr/local/etc/php.ini
Change this line (normally found near the very bottom of the PHP.ini file):
;openssl.cafile=
to (we’ve set the path to the cacert.pem file we downloaded and uncommented the option so that it becomes enabled):
openssl.cafile=/etc/ssl/cacert.pem
Save the file and we’re done!
You may also wish to update the contents of this file such file upload sizes, time zone etc. whilst editing it!
Excellent stuff, check that PHP is installed and the modules are available, to do this you can run PHP from the CLI with the -m argument…
php -m
Now that we’ve got PHP installed we now need to configure PHP-FPM to work with Nginx so that the PHP script engine handles PHP requests…
Configuring PHP-FPM
We now need to “glue” Nginx and PHP together, PHP-FPM stands for PHP Fork Process Manager and is the SAPI module that we’ll use for this installation.
As we’ve already installed PHP we should have automatically had PHP-FPM installed by default so we can now enabled the PHP-FPM service like so:
sudo sh -c 'echo php_fpm_enable=\"YES\" >> /etc/rc.conf'
and then start the service…
sudo service php-fpm start
We now need to configure Nginx and the PHP-FPM socket side of things…
sudo nano /usr/local/etc/php-fpm.conf
Now we are going to make a few changes in this file as currently PHP-FPM is listening on a TCP port but to improve performance we’ll configure it to use a socket instead (we’ll bypass the TCP layer by using a UNIX socket), so first of all locate the following line:
listen = 127.0.0.1:9000
and change it to:
listen = /var/run/php-fpm.sock
Next we’ll uncomment the listen.user, listen.group andlisten.mode sections, so locate this block and then remove the comments (remove the ‘;‘ from the start of these lines:
;listen.owner = www
;listen.group = www
;listen.mode = 0660
Great, save the changes to the file!
One more thing we need to do now and that is to add a quick “security fix” to ensure that PHP does not try to execute parts of a path if the file does not exist.
So we need to edit out PHP.ini file like so:
sudo nano /usr/local/etc/php.ini
and locate this line:
;cgi.fix_pathinfo=1
change it to (uncomment it by removing the ‘;‘ at the start of the line and set it’s value to ‘1’) like so:
cgi.fix_pathinfo=0
Save the file and then restart PHP-FPM for the changes to take affect!
sudo service php-fpm restart
Great, we’re done here now!
Installing Composer
Composer is a package manager for PHP and is used heavily by Laravel for dependency and package management…
sudo curl -sS https://getcomposer.org/installer | sudo php -- --install-dir=/usr/bin
sudo mv /usr/bin/composer.phar /usr/bin/composer
Now test it out by running…
composer --version
All going well you should see the available Composer CLI options!
Installing MySQL Server
Next we’ll install MySQL…
sudo pkg install mysql56-server mysql56-client
Then enable it…
sudo sh -c 'echo mysql_enable=\"YES\" >> /etc/rc.conf'
Now start the service…
sudo service mysql-server start
Test that the server is running by logging into MySQL like so:
mysql -u root
If you see the MySQL CLI prompt all should be good! – Simply type ‘quit‘ to exit and return to BASH!
MySQL, by default is installed without a MySQL root password (for accessing via. localhost atleast), it is however recommended that you secure your installation by running the mysql_secure_insta script like so:
sudo mysql_secure_installation
Once you’ve done that we’ll move on…
Installing Redis
For a lot of my applications I like to use Redis for caching, I’ll install it now like so:
sudo pkg install redis
As like the other applications we now need to add this to the /etc/rc.conffile and start the service, so lets add it to the file like so…
sudo sh -c 'echo redis_enable=\"YES\" >> /etc/rc.conf'
Now we start the service like so:
sudo service redis start
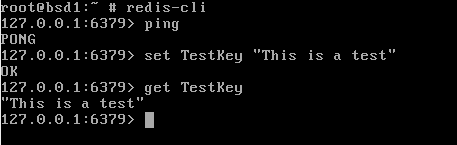
Now we’ll test it to ensure that our redis server is running, so now lets enter the Redis CLI tool like so:
redis-cli
Now we can run a couple of commands to check that Redis is responding as we would expect, enter the commands as per my screenshot below and you should get the same output…
Installing Beanstalk
Beanstalk is a message queue service that is useful when using queues in your Laravel applications.
Let’s install it now…
sudo pkg install beanstalkd
Now lets enable the service like we did previously by adding it to the /etc/rc.conf file like so:
sudo sh -c 'echo beanstalkd_enable=\"YES\" >> /etc/rc.conf'
Now lets start the service by running:
sudo service beanstalkd start
Done – Beanstalkd is now running!
Installing and configuring a firewall
You may now wish to lock down your new web application server with a software firewall – I definitely recommend you do it now and I have another post demonstrating how to configure such a firewall on FreeBSD.
Read the post about setting up a Web server firewall on FreeBSD…
Setting up your application
As you probably already know, Nginx much like other web servers is capable of hosting multiple web sites and applications in the form of ‘Virtual Hosts’.
As you may wish to set-up multiple applications/websites on your server we’ll now set-up a virtual-host configuration template and set up a standardised directory structure for your site/application data and log files.
First of all we’ll create some new directories:
sudo mkdir /var/webapps
sudo mkdir /var/log/nginx
sudo mkdir /usr/local/etc/nginx/sites-enabled/
sudo mkdir /usr/local/etc/nginx/sites-available/
These directories will enable us to have a common directory where all web applications will sit under and be hosted from. We create a new directory for Nginx access and error logs to be logged in and then we create a place to store and enable our Nginx virtual host configuration files for our sites/application.
In order for Nginx to load our site configurations we need to make a few changes to the main Nginx configuration file, so lets open the file now:
sudo nano /usr/local/etc/nginx
Firstly update the worker_processes value to match the current number of CPU cores your server has. – You can use this command on FreeBSD to detect this if you don’t know off the top of your head run:
sysctl hw.model hw.machine hw.ncpu
…the specific information you need is the value of hw.ncpu but the other information that is displayed might be useful to know too!
Next we need to include our virtualhost configuration files, we’ll therefore need to add these lines (just before the last closing brace ‘}’).:
server_names_hash_bucket_size 64;
include /usr/local/etc/nginx/sites-enabled/*;
Great stuff, now save the file and we can move on!
At this point it’s worth just checking that our Nginx configuration file(s) are still ok and we haven’t introduced any configuration errors, lets run:
sudo nginx -t
So now unless you have any errors reported by Nginx we’ll move on…
In an attempt order to speed things up in future I like to use a template and then just copy it and replace the main parts (eg. path to the application, domain name etc.) so for speed and simplicity download this template file (nginx_laravelapp_freebsd.conf) and and upload the contents it to the server in this file:-
sudo nano /usr/local/etc/nginx/sites-available/webapp.tpl
Great, the template is configured specifically for hosting Laravel 4.x and 5.x web applications but once you’ve copied for of your application to you tweak it as much as you like for example, you could use it to host a WordPress blog too (just remove the ‘/public’ directory from the end of the ‘root’ directory path setting.
Deploying web sites/applications
Now that the core server is setup, Every time you wish to deploy a new web site/application you can now following these steps:
1) Create two new directories, these will be for the web site/application files and the virtual host log files:
sudo mkdir /var/webapps/{APPNAME}
sudo mkdir /var/log/nginx/{APPNAME}
2) Copy the virtual host template file into the sites-available directory so that you have a customisable version of the virtualhost template and that you will configure to server your application at a given domain.
sudo cp /usr/local/etc/nginx/sites-available/webapp.tpl /usr/local/etc/nginx/sites-available/{APPNAME}.conf
3) Enable the web application (to be served by Nginx)…
sudo ln -s /usr/local/etc/nginx/sites-available/{APPNAME}.conf /usr/local/etc/nginx/sites-enabled/{APPNAME}.conf
4) You now need to edit the virtualhost file to configure site/application specific variables, edit the file by running:
sudo /usr/local/etc/nginx/sites-available/{APPNAME}.conf
…simply replace the following place-holders with your application/site specific settings:
@@APPNAME@@ – This should be the same as your application folder name that you createe under /var/webapps/ eg. ‘testapp‘
@@DOMIN@@ – This should be all hostnames (seperated by spaces) that the appliction will respond to eg. ‘mytest.com www.mytest.com‘
@@ENVIROMENT@@ – eg. ‘production‘
5) Reload Nginx’s configuration to start serving the new site/application:
sudo service nginx restart
Congratulations, your site should now be running on Nginx – If you wish to configure and host other sites/applications in future on this server simply re-run steps 1 to 5!
File and configuration paths
I figured that it may be worth me just jotting down the key configuration files and their locations (may save you hunting around for them later):
- Main Nginx Configuration file:/usr/local/etc/nginx/nginx.conf
- Nginx virtual host configurations: /usr/local/etc/nginx/sites-available
- Main PHP.ini file: /usr/local/etc/php.ini
- PHP extensions configuration:/usr/local/etc/php/extentions.ini
- PHP-FPM configuration file: /usr/local/etc/php-fpm.conf
- MySQL configuration file: /usr/local/my.cnf
- Sudoers configuration file: /usr/local/etc/sudoers
- SSHd configuration file (great for changing default port etc.): /etc/ssh/sshd_config
- CA Certficiate file (as used by OpenSSL): /etc/ssl/cacert.pem
- Laravel 4/5 Nginx virtual-host template file: /usr/local/etc/nginx/sites-available/webapp.tpl
- Your web site/application data: /etc/webapps
- You web site/application log files: /var/log/nginx
source : http://blog.bobbyallen.me/2015/04/08/configure-a-freebsd-10-1-server-for-hosting-laravel-5-x-applications/
Posted on: March 4, 2019, by : Julian's | 9 views