How to install SuPHP on CentOS 7.2
 You shall have a server that has CentOS 7.2 or later installed, I will use this tutorial as basis for my setup. In the first chapter, I will install the Apache web server. If you have apache already installed, then start with chapter 2 right away.
My server will use the hostname server1.example.com and the IP address 192.168.1.100. Replace these values with the hostname and IP of your server wherever they occur in the following tutorial.
I recommend to have a firewall installed for security reasons, if you do not have firewalld installed yet, then you can install it with these commands:
yum -y install firewalld
start the firewall and enable it to be started at boot time.
systemctl start firewalld.service
systemctl enable firewalld.service
Next, open your SSH port to ensure that you will be able to connect to the server by SSH.
firewall-cmd –permanent –zone=public –add-service=ssh
firewall-cmd –reload
1 Installation of Apache 2.4 and PHP 5
Apache and PHP are available in the CentOS base repository, so we can install both software packages with yum.
Install Apache and the Aapache development package which contains files that are required for the SuPHP compilation later.
yum -y install httpd httpd-devel
PHP installation (I’ve added some frequently used PHP modules):
yum -y install php php-mysql php-gd php-pear php-xml php-xmlrpc php-mbstring curl
We have to enable Apache to start at boot time and start the service.
systemctl start httpd.service
systemctl enable httpd.service
We have to open the HTTP (80) and HTTPS (443) ports to make the web server accessible from other computers. Run the following commands to configure the firewall.
firewall-cmd –permanent –zone=public –add-service=http
firewall-cmd –permanent –zone=public –add-service=https
firewall-cmd –reload
2 Installation of SuPHP
We will compile SuPHP from source in this step. Install the development tools to setup the required build chain.
yum -y groupinstall ‘Development Tools’
And wget to download the source files and the nano editor.
yum -y install wget nano
Download the SuPHP source tar.gz archive and unpack it.
cd /usr/local/src
wget http://suphp.org/download/suphp-0.7.2.tar.gz
tar zxvf suphp-0.7.2.tar.gz
CentOS 7 uses Apache 2.4, so we have to patch suphp before we can compile it aganst Apache. The patch gets applied like this:
wget -O suphp.patch https://lists.marsching.com/pipermail/suphp/attachments/20130520/74f3ac02/attachment.patch
patch -Np1 -d suphp-0.7.2 < suphp.patch
cd suphp-0.7.2
autoreconf -if
libtoolize: putting auxiliary files in AC_CONFIG_AUX_DIR, `config’.
libtoolize: copying file `config/ltmain.sh’
libtoolize: Consider adding `AC_CONFIG_MACRO_DIR([m4])’ to configure.ac and
libtoolize: rerunning libtoolize, to keep the correct libtool macros in-tree.
libtoolize: Consider adding `-I m4′ to ACLOCAL_AMFLAGS in Makefile.am.
configure.ac:9: warning: AM_INIT_AUTOMAKE: two- and three-arguments forms are deprecated. For more info, see:
configure.ac:9: http://www.gnu.org/software/automake/manual/automake.html#Modernize-AM_005fINIT_005fAUTOMAKE-invocation
configure.ac:24: installing ‘config/config.guess’
configure.ac:24: installing ‘config/config.sub’
configure.ac:9: installing ‘config/install-sh’
configure.ac:9: installing ‘config/missing’
src/Makefile.am: installing ‘config/depcomp’
[root@server1 suphp-0.7.2]#
The autoreconf command applies the patch, now we can configure the new source as follows. NOTE: The configure command is one line!
./configure –prefix=/usr/ –sysconfdir=/etc/ –with-apr=/usr/bin/apr-1-config –with-apache-user=apache –with-setid-mode=owner –with-logfile=/var/log/httpd/suphp_log
Then compile and install SuPHP.
make
make install
Then add the suPHP module to the Apache configuration by adding a new suphp.conf file.
nano /etc/httpd/conf.d/suphp.conf
With the following content.
LoadModule suphp_module modules/mod_suphp.so
… and create the file /etc/suphp.conf as follows:
nano /etc/suphp.conf
[global]
;Path to logfile
logfile=/var/log/httpd/suphp.log
;Loglevel
loglevel=info
;User Apache is running as
webserver_user=apache
;Path all scripts have to be in
docroot=/
;Path to chroot() to before executing script
;chroot=/mychroot
; Security options
allow_file_group_writeable=true
allow_file_others_writeable=false
allow_directory_group_writeable=true
allow_directory_others_writeable=false
;Check wheter script is within DOCUMENT_ROOT
check_vhost_docroot=true
;Send minor error messages to browser
errors_to_browser=false
;PATH environment variable
env_path=/bin:/usr/bin
;Umask to set, specify in octal notation
umask=0077
; Minimum UID
min_uid=100
; Minimum GID
min_gid=100

[handlers]
;Handler for php-scripts
x-httpd-suphp="php:/usr/bin/php-cgi"
;Handler for CGI-scripts
x-suphp-cgi="execute:!self"
Finally, we restart Apache:
systemctl restart httpd.service
3 Configure an Apache Vhost with SuPHP
In this chapter, I will show how you can add a virtual host in apache that runs PHP under a separate user. I will use the domain name www.example.com for the website and PHP shall run as user and group “web1“, the document root for the website is /var/www/example.com
First, add a new user and group “web1”.
useradd web1
Add the website root directory.
mkdir /var/www/example.com
chown web1:web1 /var/www/example.com
Now add the virtual host configuration file in the apache conf.d directory.
nano /etc/httpd/conf.d/example.com.conf
with this content:
<VirtualHost *>
 DocumentRoot /var/www/example.com
 ServerName example.com
 ServerAdmin webmaster@example.com

 <FilesMatch ".+\.ph(p[345]?|t|tml)$">
 SetHandler None
 </FilesMatch>

 <IfModule mod_suphp.c>
 suPHP_Engine on
 <FilesMatch "\.php[345]?$">
 SetHandler x-httpd-suphp
 </FilesMatch>
 suPHP_AddHandler x-httpd-suphp
 </IfModule>
</VirtualHost>
Replace the domain name with your own domain in the ServerName and ServerAdmin lines.
Then restart apache to apply the config changes.
systemctl restart httpd.service
4 Test the SuPHP setup
In this chapter, I will show you several methods to test PHP in this website. First, I will create a file that uses the phpinfo() function to show if PHP is working and if it runs in CGI mode now.
Create an info.php file with nano:
nano /var/www/example.com/info.php
and add the following lines to the new file:
<?php
phpinfo();
Then change the owner of the file to the web1 user and group.
chown web1:web1 /var/www/example.com/info.php
Open the URL of the file http://example.com/info.php in a web browser, it shall show the following page.
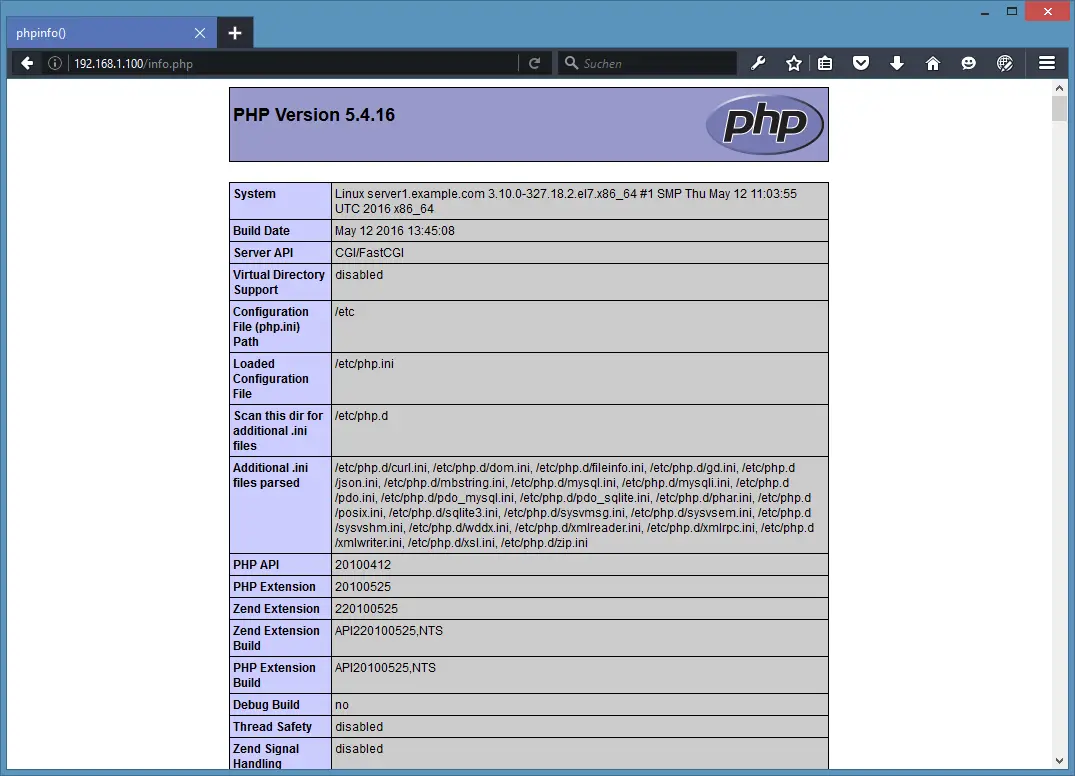
Important is the ServerAPI line which shows CGI/FastCGI. which shows that PHP is run trough SuPHP and not mod_php.
Now I will test if PHP runs under the correct user (web1). How does SuPHP know which user it shall use? SuPHP switches PHP to the user that owns the PHP script, so it is important that all PHP files in our web root folder /var/www/example.com are owned by the web1 user and group.
So, how to test if PHP uses the right user? One way is to execute the “whoami” command which return the username.
I’ll create a new script testuser.php in the website root:
nano /var/www/example.com/testuser.php
with this content:
<?php
system('whoami');
Then change the owner of the file to the web1 user and group.
chown web1:web1 /var/www/example.com/testuser.php
Open http://example.com/testuser.php in a web browser, the result shall the: web1
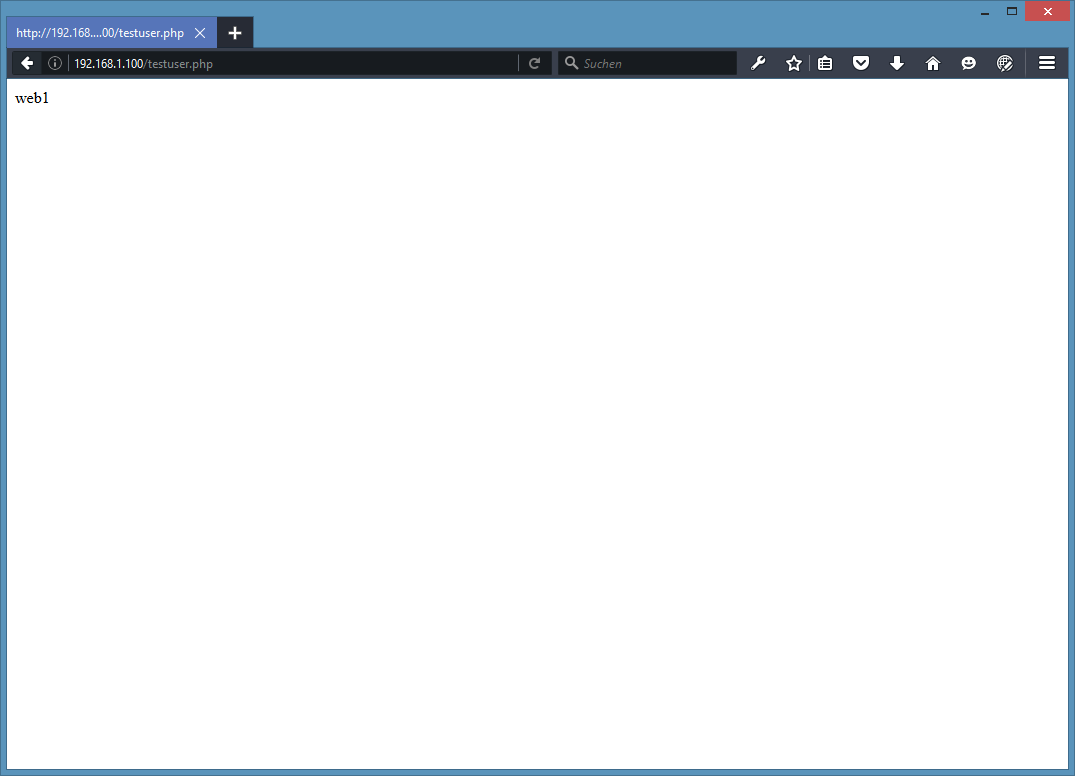
SuPHP is configured and executes the PHP files as the user of this website. Remove the test files from the website directory and start adding your website scripts.
5 Download this CentOS 7.2 server as virtual machine
This setup is available as virtual machine download in ova/ovf format (compatible with VMWare and Virtualbox) for howtoforge subscribers.
Login details for the VM
- The root password is: howtoforge
- The password of the “administrator” user is: howtoforge
Please change both passwords on the first login.
- The IP address of the VM is 192.168.1.100
source : https://www.howtoforge.com/tutorial/install-suphp-on-centos-7/
Posted on: November 6, 2017, by : Julian's | 22 views